What would you like to learn about?
Aliexpress link gives error message instead of product listing
If you click on an Aliexpress link on a product card and you get an error message like "Sorry, your search "product name" did not match any products.". This might happens on some products that say "No Orders Data Available". For those products, when you click the Aliexpress link you will go to a "SEARCH" page on Aliexpress and not to actual product. Sometimes the search does not work and that is when you will see that message. For all other products that have orders data, then the Aliexpress link will take you straight to that product page on Aliexpress"
Are there any additional subscription fees?
No, our pricing is transparent, and there are no hidden fees. The subscription cost covers all features.
Can I cancel my subscription anytime?
Yes, you have the flexibility to cancel your subscription at any time without any long-term commitment.
Can I import products directly from Aliexpress?
Check out the video below and see exactly how to import trending products straight into your store. Make sure you install our chrome extension from the chrome store.
https://www.sellthetrend.com/blog/new-aliexpress-product-importer
Can I use a different language than English for Sell The Trend Shops?
Though Sell The Trend Shops doesn't currently support multiple languages, you can definitely use your local language on your Sell The Trend Shop. This is what you are able to do:
- Use your local currency. Customers will be able to see prices in your local currency or switch to other currencies as well. You will choose currency during shop creation.
- Create Shop pages in your local currency. Page titles and content.
- Product Title and description can be in your local currency as well as product URLS.
- Connect payment gateway (PayPal or Stripe for example) using your own local currency account. You do not need to open a bank account or new paypal/stripe account to use Sell The Trend Shops. Just connect your existing Stripe/PayPal account. You can even create one directly using Sell The Trend Shops if you don't have one and use your local bank accounts/credit cards.
Can I use the Photos and Videos from Sell The Trend?
Before you use any photos or videos you did not create or own, you should ask the copyright owner for permission by contacting them directly. If you want to use "free-to-use" images, then make sure to click the "Use these Images" link in the Push To Store Fulfillment Supplier section as these images come directly from the supplier and can be used directly on your website.
If you would like to use the videos in advertising campaigns, then make sure to contact the supplier before you do so. They should have no problem with this, since you will be ordering products from them. If you are on the Nexus Push to Store page for that product, you can click on the “Contact” link in the Fulfillment Source area to directly connect with the supplier.
Can you connect me with Suppliers that ship from the US?
We show you suppliers, servicing different parts of the world. Some will have USA shipping for faster shipping times. You can filter by suppliers that offer USA shipping from our Explorers including the NEXUS explorer.
Can you see if a supplier offers epacket shipping?
Yes. Once you click push to store you can see if supplier has epacket.
Connecting CJDropshipping Account To Sell The Trend
In this quick guide we are going to go through the process of connecting a CJDropshipping account to Sell The Trend. This will allow you to fulfill orders for products sourced from CJDropshipping.
Step 1
Sign in to your CJDropshipping account or if you do not already have an account, you can Sign Up Here for Free.
Step 2
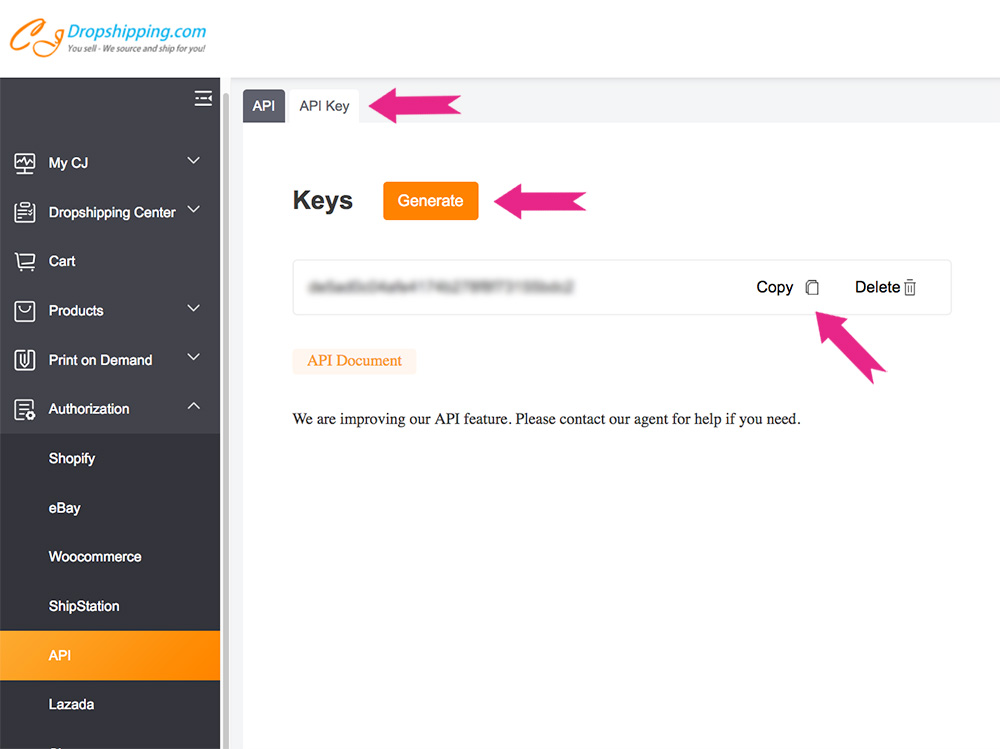
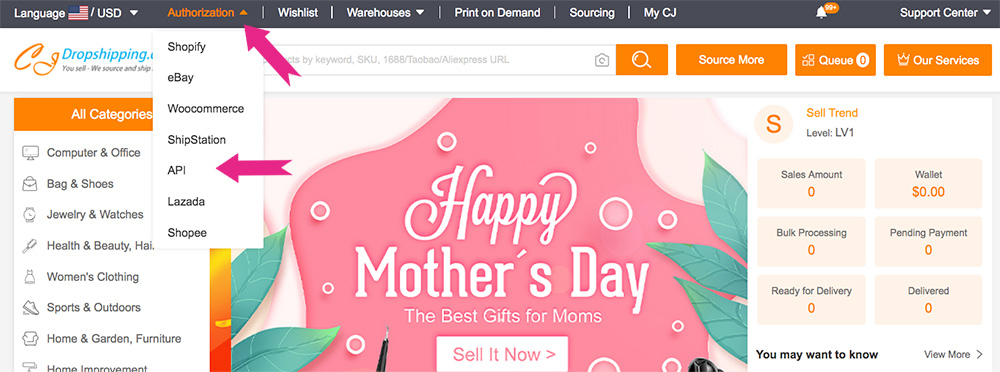
After logging in, go to Authorization > API > API Key, then click Generate to create your own API Key, and then click Copy.
Step 3
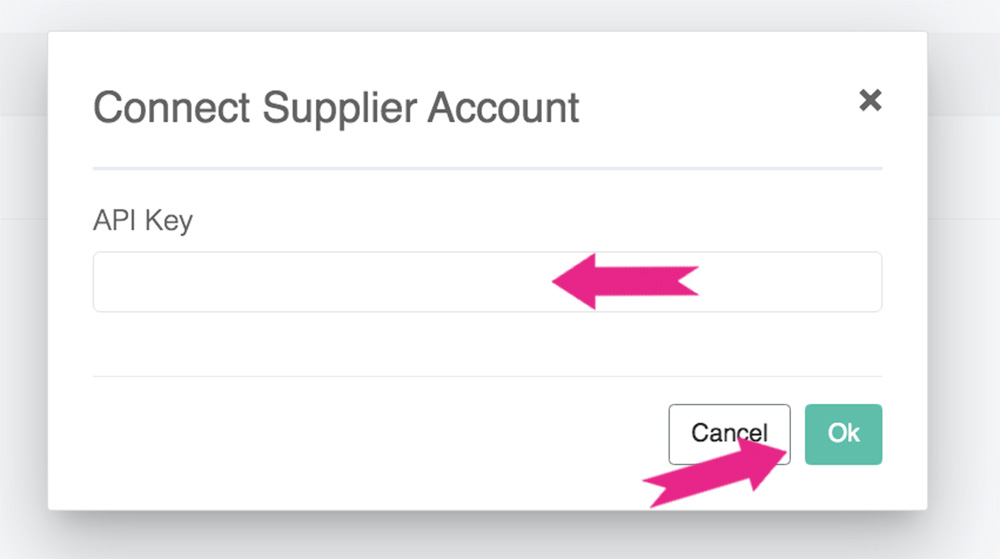
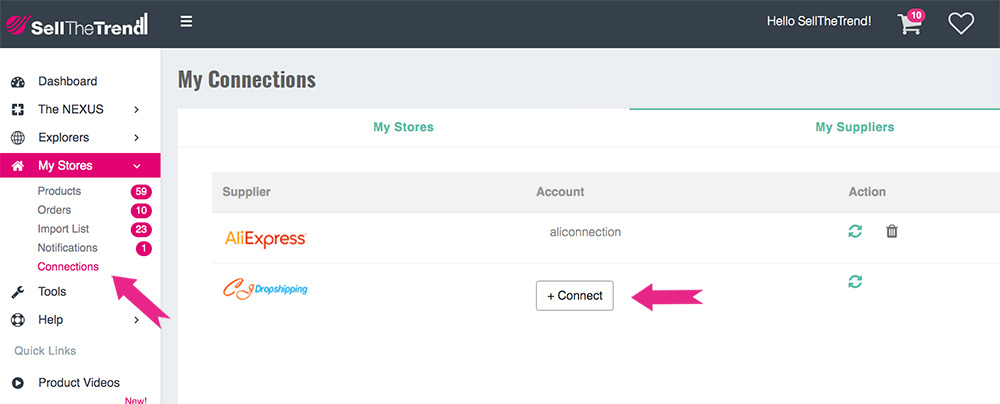
Go back to Sell The Trend and click on My Stores > Connections, click on Connect and then paste your API Key.
Step 4
That's All! You are now ready to process any orders for products sourced from CJDropshipping.
Correcting the This Order Cant be shipped from your location error.
After the customer has added products to their Shopify cart and is ready to check out, they encounter on the shipping selection page a message that says
"This order can’t be shipped to your location. Contact the store for more information."
This error is caused by missing shipping rates usually as they relate to international customers, but not always. In this article we go through the steps required to resolve this issue
1. Login to your Shopify store, click the Settings button, then select Shipping and Delivery from the list of options.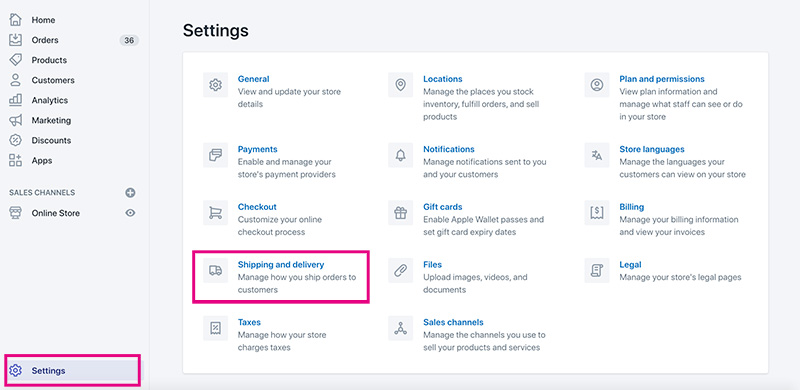
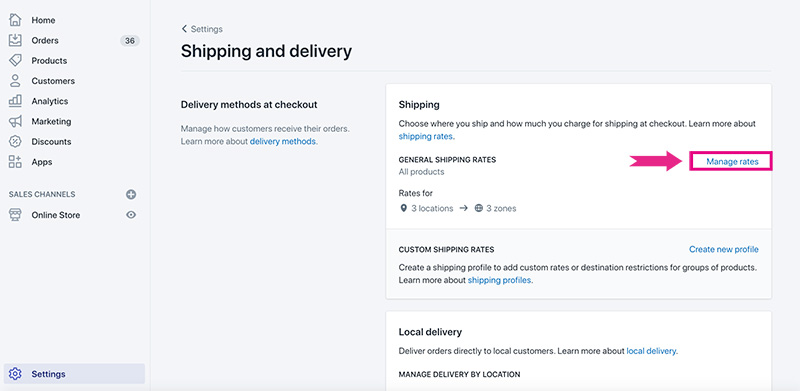
2. At the top of the Shipping and Delivery page, click the Manage Rates button found in the upper right hand corner of the General Shipping Rates section.
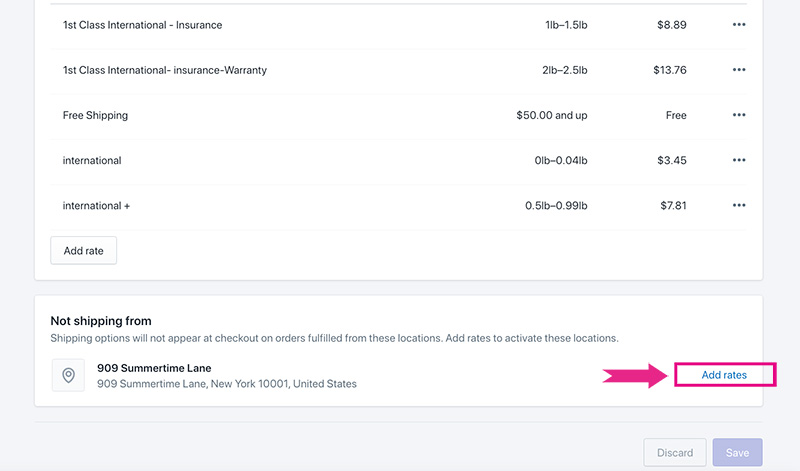
3. At the very bottom of the Manage Rates page, click the Add Rates button.
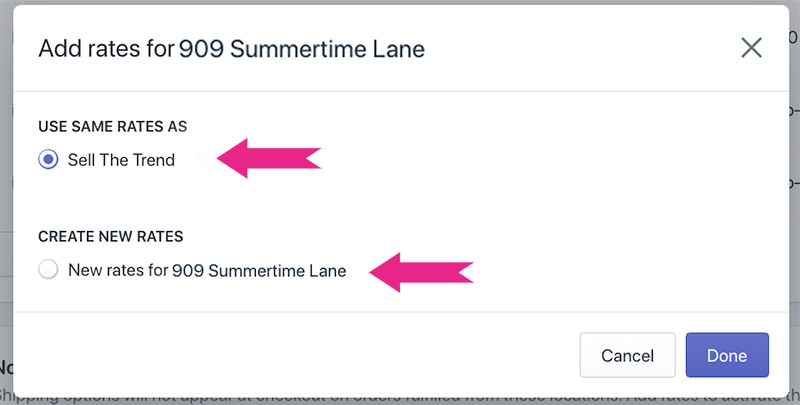
4. Review the information on the window that pops up. Either select "Use same rates as" a working set of rates, or click to create new rates if no good rates have already been set up. Then click the Done button.
5. The final step will be to click the Save button at the top of the page to ensure that all changes are saved.

That's it. The checkout process should now continue as usual.
Do you guys have API i can integrate with?
No API currently, only direct integration with ecom platforms (ie: shopify, woocommerce)
Do you happen to know what is the hottest selling item according to your data?
Check the NEXUS > Hot products for popular products. For the most trending products right now, check NEXUS > trending products. If you want to see all products in The NEXUS, Check the NEXUS > all products. For all NEXUS products make sure to sort by NEXUS rank highest.
Do you have an Affiliate Program?
Yes we do! You can find out the details on this page.
https://www.sellthetrend.com/Affiliate
If you are already a member you don't need to signup and can just go here to access your affiliate links
Access the Affiliate Dashboard
Do you offer any Facebook Training?
We have a very popular Facebook Masterclass course available at https://www.sellthetrend.com/facebookcourse. The course has 27 Modules and counting!
Does your app show data according to countries as well? e.g which product trending in which country?
If you click on the product research button, you'll be able to see the nationality of the stores selling the product as well as the Top Customer Countries as well. You can also filter by Top Customer Countries.
Does your Plan include shipping? Or is it managed directly by Aliexress?
It's managed directly by AliExpress.
How can I connect my Store or Shop?
To connect your shop, go to the left menu and select Manage > Connections > Connect Store. OR you can click the Connect Store Button in the Top Header of the app.
You will then be presented with a popup that looks like this:
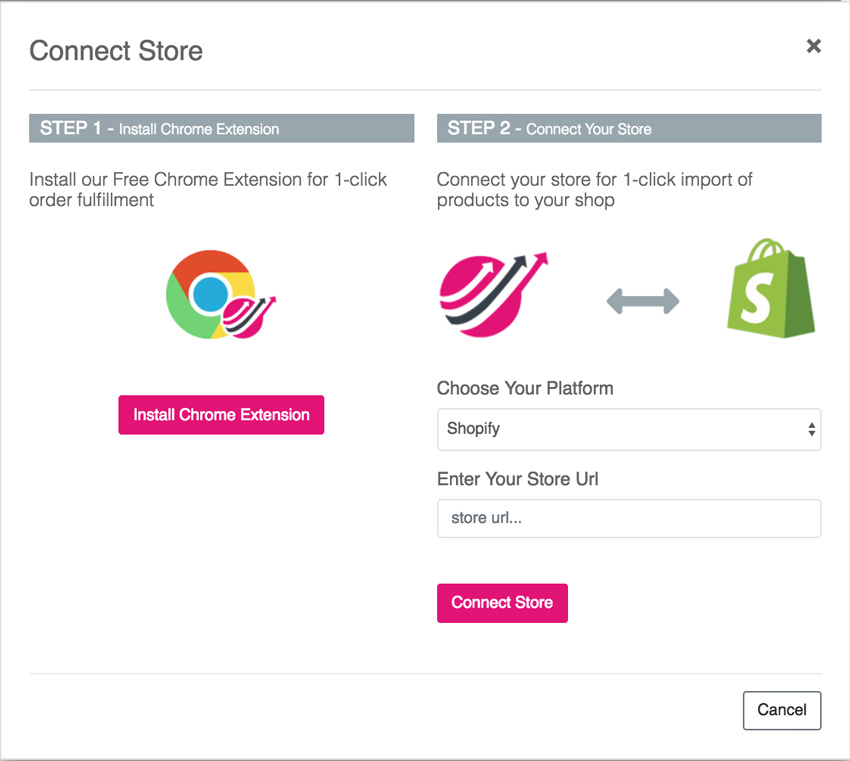
Select the type of store you have (i.e., Shopify or WooCommerce) and then enter your store URL in the field provided.
This will then go to the respective e-commerce platform and ask you for authorization to connect your store to Sell The Trend. Approve the request. That's it! You are all done and ready to start importing products.
How do I add a supplier if none are available for a product?
Some products will not have suppliers that are already in the system. You might see this message on the Fulfillment Source section of the Push To Store page.
"We don't currently have any suppliers for this product, but fear not! locate a supplier by clicking on the button below and enter that product URL in the + Custom Source button above."
In order to add a custom supplier, you can click on the "Search for Suppliers" button to go to Aliexpress and search for suppliers selling a similar product. Once you locate a similar product, copy the entire URL from your browser and head back to Sell The Trend. click the Custom Source button and paste the URL you just copied into the popup and click ok.
This will create a custom supplier in the system for you to use while fulfilling orders that you get for this product.
How do I add videos from Sell The Trend to my Shopify store?
The easiest way would be to upload the video to youtube and then using that link in Shopify.
How Do I Sign up to Sell The Trend?
Go to https://www.sellthetrend.com/start-free-trial to Signup
How do I stop Shopify orders from being automatically fulfilled?
If your Shopify orders are marked as shipped as soon as the order is placed, it is probably due to your Shopify store automatically marking all paid orders as "fulfilled".
The setting will break Sell The Trend's Order fulfillment process and your order will not be getting set to the supplier for fulfillment correctly.
To turn off automatic order fulfillment in Shopify:
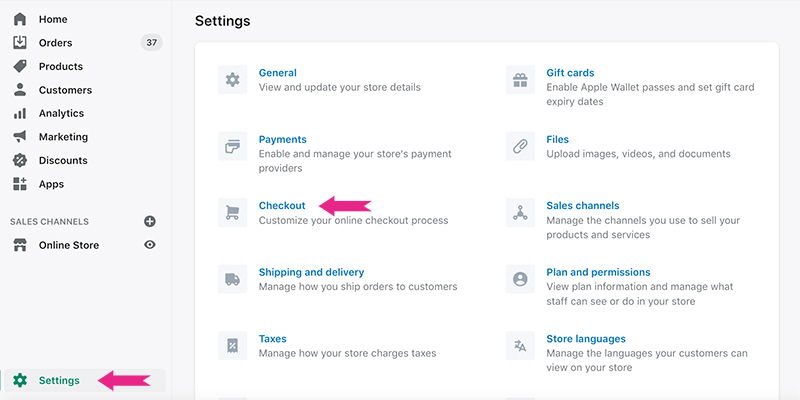
- In your Shopify admin, navigate to Settings > Checkout.
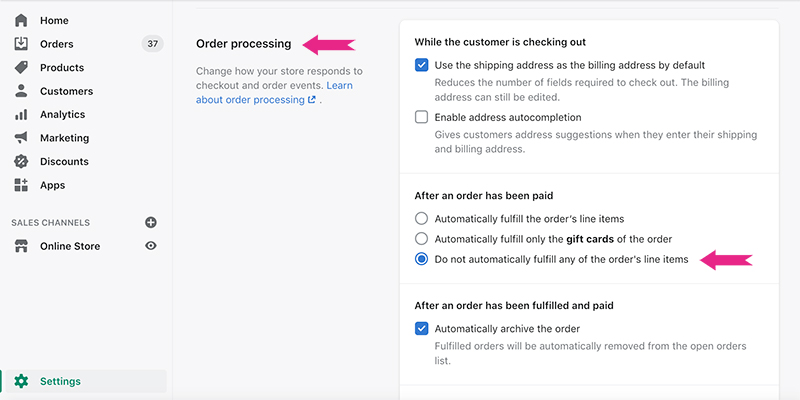
- In the Order processing section, look for the setting with the label "After an order has been paid".
- Select "Do not automatically fulfill any of the order’s line items."
How Do I Update Fulfillment Suppliers?
If a supplier is no longer selling a particular product, you can use the Update Fulfillment supplier function to switch suppliers and continue selling the product. Sometimes a supplier has simply changed the options they offer and you want to "refresh" the current options offered. This feature can also be used in the event you did not import a product using "include variations" and you want to start selling the product with all available options. Follow the steps below to switch or update supplier info.
1. Go to My Stores > Products and locate the product you would like to update suppliers for. You can use the search to locate it by name and then click Update Fulfillment Source

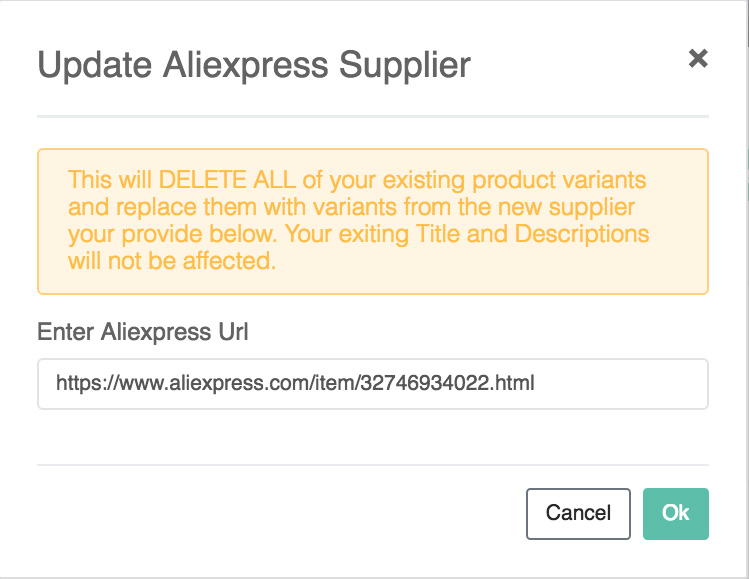
2. Locate a similar product on Aliexpress to the one you are trying to switch suppliers for. You can either use Sell The Trend's A.I. Supplier List feature to locate similar products or search directly on Aliexpress. Once you locate a product, copy the URL exactly as you see it in your browser address bar. Enter this info into the "Update Aliexpress Supplier" dialog. If you are using the A.I. Supplier Feature then just click the Select button once you find a suitable supplier.
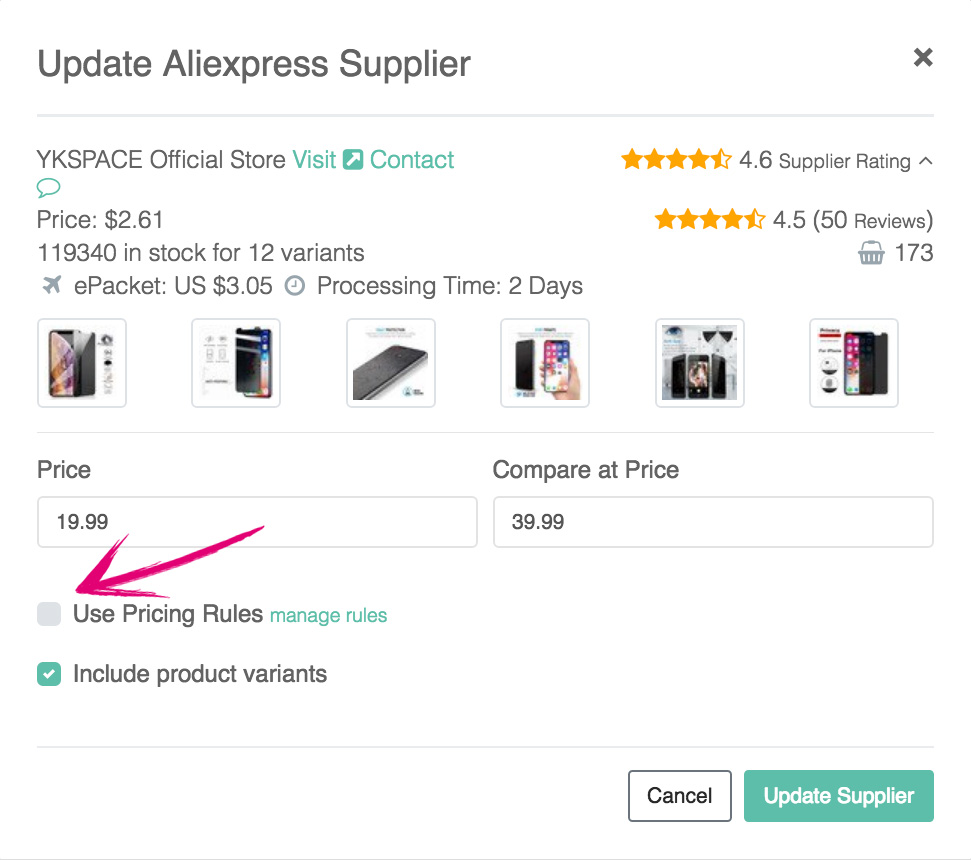
3. Once the new supplier information loads up, enter the product pricing (what you want to sell the product for) or you can choose to click on "Use Pricing Rules" so that each variation will get priced based on the variation price multiplied by the price multipliers entered into the Settings (Automation) area.
4. If the product you are trying to update does not have any pending orders, then you are done! If, on the other hand, the current product you are trying to switch suppliers for is in one or more pending orders, then you will need to match variations between the original product and the product from the new supplier.
For every variation on the left, make sure to match an appropriate variation on the right from the new supplier. As you can see in the example below, we located a supplier selling similar variations of this product so that we can match the same type of iPhone cases between the two suppliers. Click Update Supplier and you are done! You would now be able to fulfill any pending orders with this new supplier.

How To Connect WooCommerce Store to Sell The Trend
Head to your store's admin area in Wordpress/WooCommerce.
From the Left Menu go to Settings > Permalinks. Make sure that Post Name is selected

Make sure that your .htaccess file is writable in order for these changes to work. You can tell if your .htaccess is writable by checking at the bottom of the setting page for this message. If it's there, follow the instructions on that message and then continue.

Next, click on WooCommerce > Settings from the left menu. Click on the "Advanced" tab all the way at the right side. If you don't see an Advanced Tab, but instead see a tab called API, then make sure to select the checkbox that says "Enable the REST API". Then press the Keys/Apps button in blue. If you have the Advanced tab screen, click "REST API." Keys/Apps and REST API will bring you to the same screen.
Press the Add Key button.

In the Description, type in "Sell The Trend." Make sure the user selected in the USE input box is an admin level user. Change the permissions to Read/Write. Press the Generate API key button. Here you will see your consumer key and secret. This allows Sell The Trend to connect to your store.
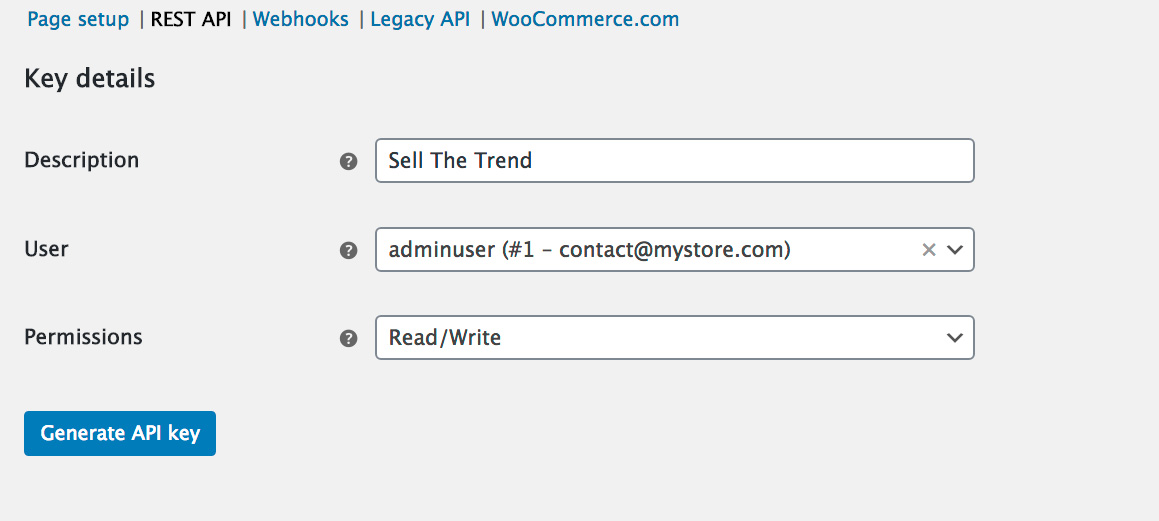
Go back to Sell The Trend and from Left Menu My Stores > Connect Store, select WooCommerce and enter your store URL. Approve access once you are prompted.
How to find untapped products on Sell The Trend
Finding Winning Products
For anyone starting out we actually recommend to find products that are ALREADY selling. These products will be MUCH easier to sell since there is proven demand from the public. You can find such products by going to Left Menu > Products > Trending. Yes there would be more competition, but also higher chance of sales. There are Billions of people online (facebook, tiktok, twitter, etc..) and lots of ways to sell them products they might have already seen in other ads but have not purchased yet. Check out our included dropshipping course ( Left Menu > Dropship Course) for some ideas of how to create ads, or our Facebook Ads Masterclass course if you need more help with running successful ads on Facebook. https://www.sellthetrend.com/facebookcourse
Finding Untapped Products
The thing about "untapped" products is that the reason they are untapped is because they are not proven yet. Once they prove themselves in the marketplace (through demand from the public) then they become winning products. But for this we also have a few methods to find these untapped products.
- NEXUS Method: Go to Left Menu > Products > On The Rise and sort by Least Stores Selling. Here you will find products with very little orders, but could also be from highly ranked stores and you be able to find some hidden gems this way.
- Explorers Method: You can go to Left Menu > Suppliers > CJDropshipping and filter by found date (one month) and sort by Most lists. This is a goldmine since CJDropshipping does not add duplicates of products (unlike Aliexpress where there are many suppliers selling the same product). Sorting by most lists shows you which products have the most amount dropshippers adding to their stores. You can also do other sorting options to find more hot products that are new and starting to make waves.
- Hot Stores Method: Go to our NEXUS Hot Stores (left menu > Products > Hot Stores) and look at the top dropshipping stores (filter by Dropshipping Stores). Take gadgetgerbil.com (ranked #5) or https://slashare.com (ranked #11) for example. You can then check the Latest products they are adding using the Store Intelligence button. You can even check their top sellers for more winners. Save those stores to your favorites by clicking on the Heart Icon and you will be notified every time they add new products. New product listings by top stores means potential new untapped winners.
How to Fix WooCommerce Error
The most well-known reason for this issue is that your store is utilizing WooCommerce version 3.5 or prior. Ensure you move up to the most recent WooCommerce version prior to connecting your shop.
- Your store doesn't have a valid HTTPS/SSL certificate. Ensure you install and activate one so our app can communicated with the WooCommerce API.
- For the module to work WordPress should be installed at domain or subdomain level, not at page level. For instance, say you're building up a store for a customer and you're making a mockup on www.example.com/userstore/. Our server will attempt to associate with the WooCommerce API at subdomain level, on www.example.com however the store is setup on www.example.com/userstore/. As another option, you can stall the development store on the userstore.example.com subdomain, that it will work.
- Your site is password protected, or is still "coming soon" or you're using a "site under development" module that is blocking the connection to your store. This likewise disables the API access and our application cannot connect to your shop.
- You have a caching plugin or similar plugins on your store that strips the "authorization" header. Try disabling any such plugins individually one by one to locate the one that is causing the issue.
You can try adding the following to your .htaccess file as it might resolve the issue:
SetEnvIf Authorization "(.*)" HTTP_AUTHORIZATION=$1
If that does not help, please review the configuration of your caching plugins and look for settings that pertain to caching or not caching headers.
If that does not work, contact your hosting provider.
How to Fulfill Your Aliexpress Orders Using Sell The Trend
Fulfilling your Aliexpress orders through Sell The Trend has never been easier. Checkout the complete tutorial below and learn how to connect your Aliexpress account and fulfill orders.
How to read the orders Trend chart?
This is a cumulative chart. So if the orders are not continually going up it means it's no longer selling on that store. Just because a product is no longer collecting orders does not necessarily mean its no longer selling, as the buyer that might be scaling this product could now be buying directly from the supplier through CSV orders or other direct methods. Always check other factors (stores selling, when was it last added to a store,etc…) to confirm a product’s strength.
How to read the Stores Trend Charts?
There are two charts that show up for Stores Trend. The Added to Store by Day show you a day by day chart of when a product was added to store. This is a good way to see the breakdown of the actual days that the product was being added to stores around the world.
The Added to Store Trend chart on the other hand is a great way to see the "trend" of a product at a glance. if the chart is still going up, it means new stores are adding this product, while a flat chart shows that no new stores are adding this product.
How to Reset Order from Within Shopify
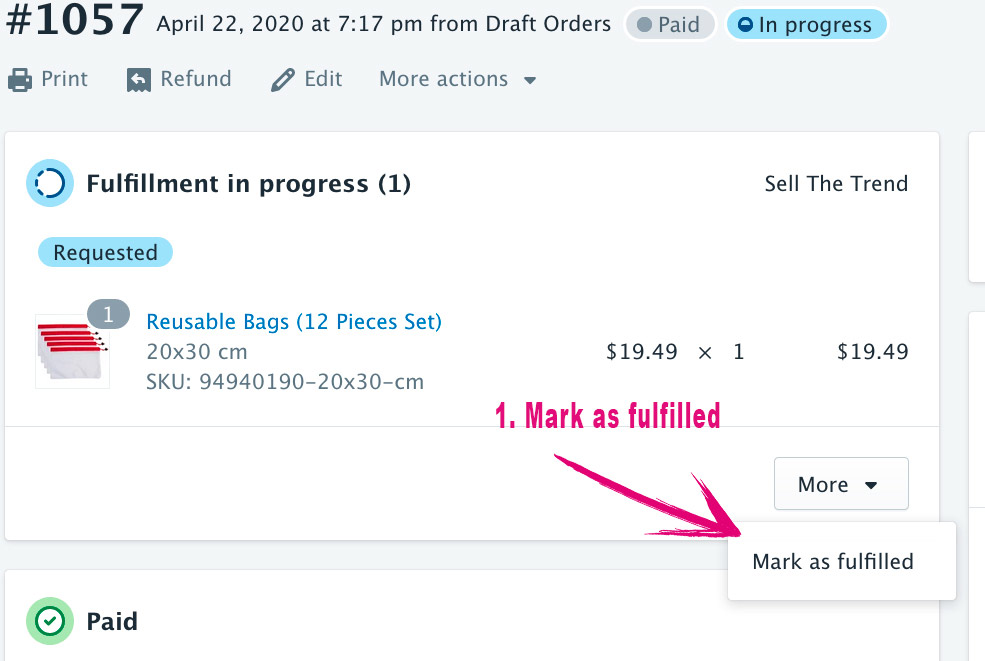
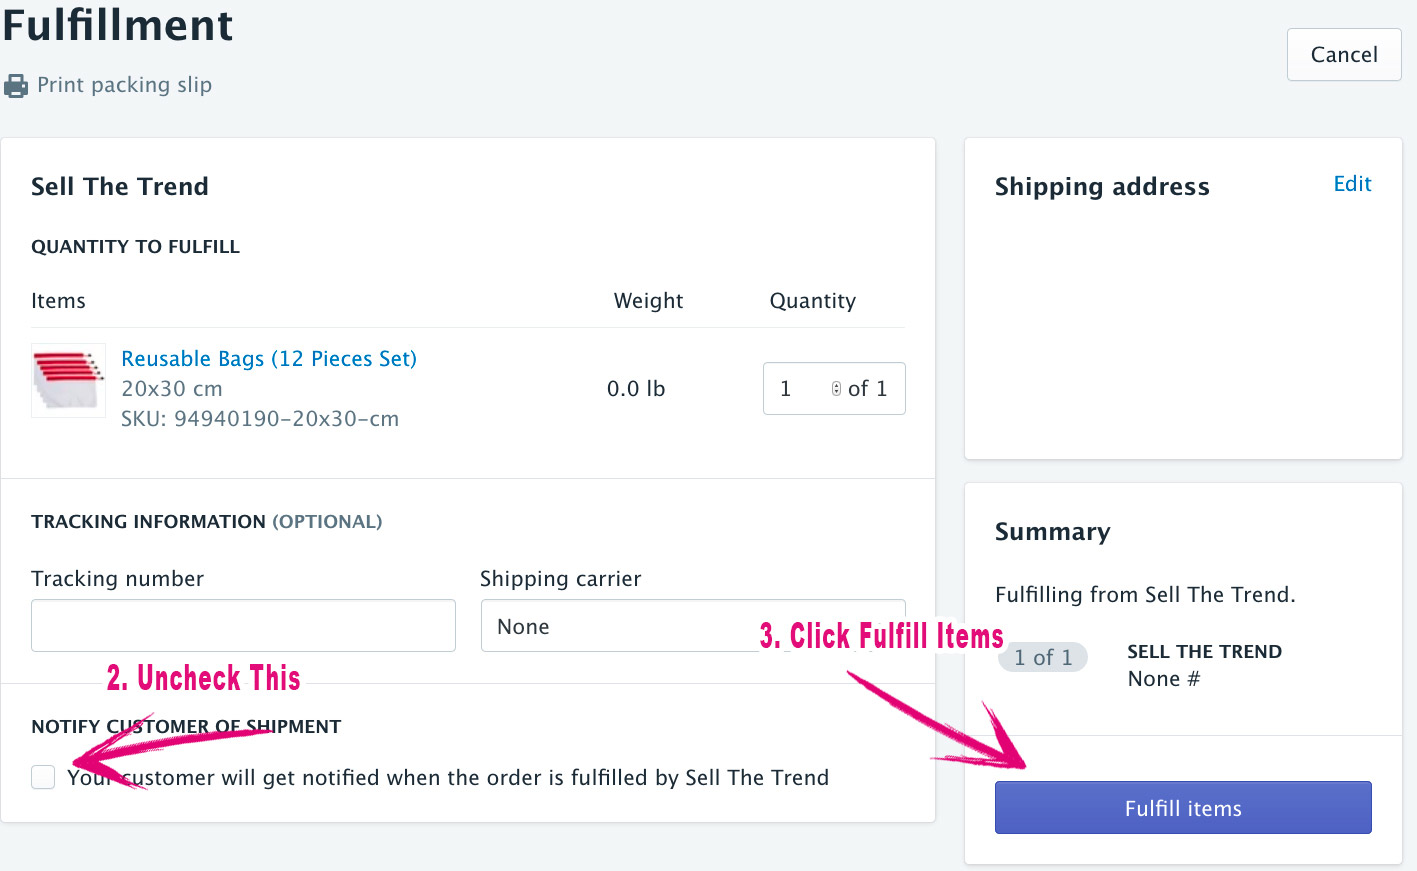
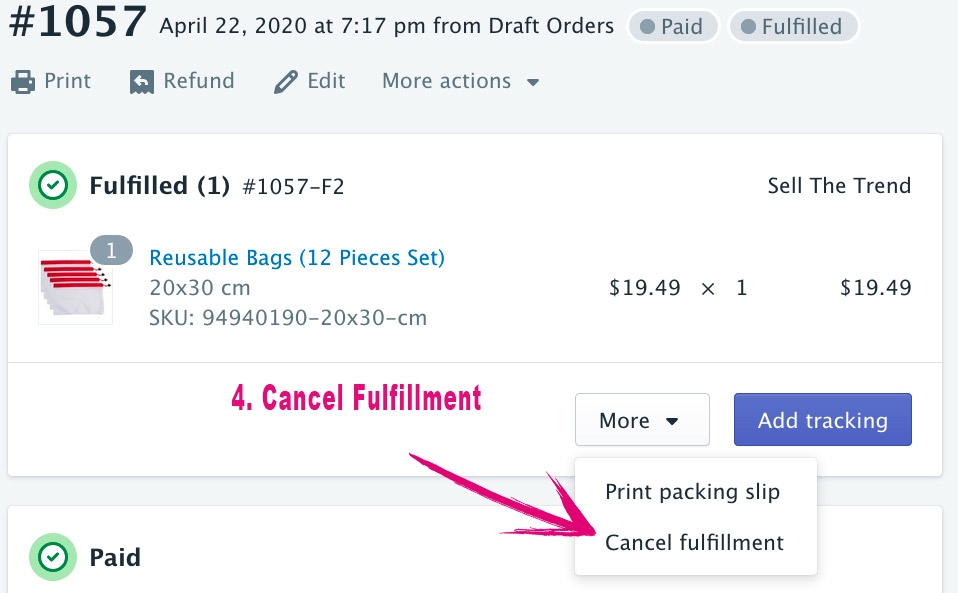
Below is the process to re-set your Order from within Shopify in the event you had pressed "Request Fulfillment" or have auto-fulfill order setup within your Shopify Settings. All fulfillment should be handled from within Sell The Trend My Orders Page. If you see orders appear fulfilled when you have not actually pressed "Order product" and launched the fulfillment process, then you can use this process to undo that "auto-fulfillment".
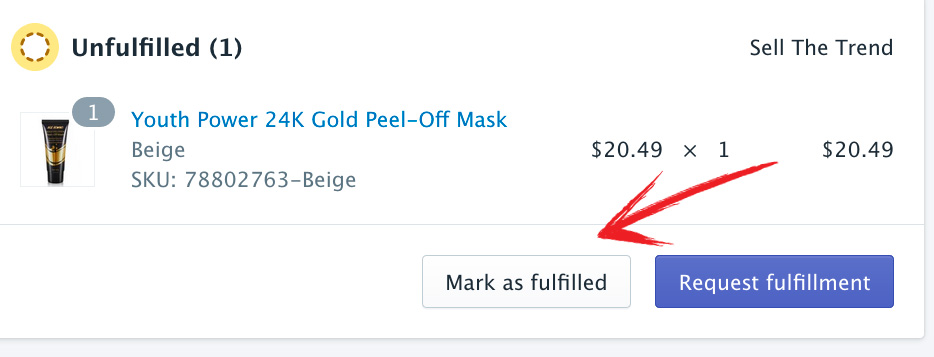
Please follow the process outlined in the screenshots included to fix this issue. There are 4 steps to go through marked 1 to 4. Once those are completed, the order will be-reset and you should be able to fulfill it from Sell The Trend My Orders Page.
How To Set Advanced Pricing Rules For Your Products
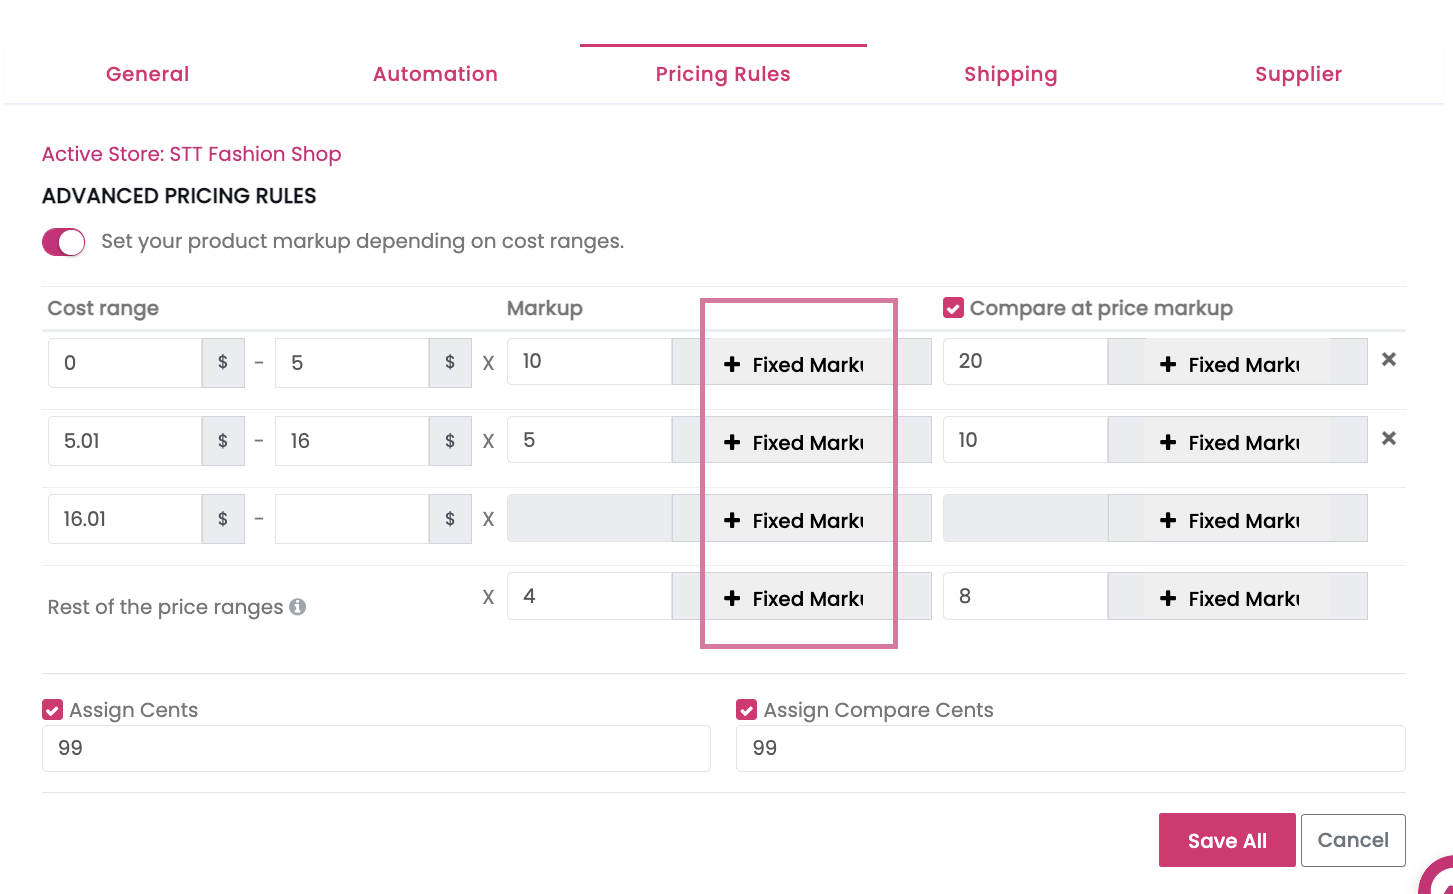
In this article we will go through the process of setting advanced pricing rules for your products. This will allow you to have flexible markup automatically applied for your products when you import them to your store using our Push To Store feature. Essentially this will allow you to markup a low cost product, for example one costing only $1.99 by a larger amount than for a higher priced item costing $23.99 for example.
Let's go through how to accomplish this using Sell The Trend's Advanced pricing rules.
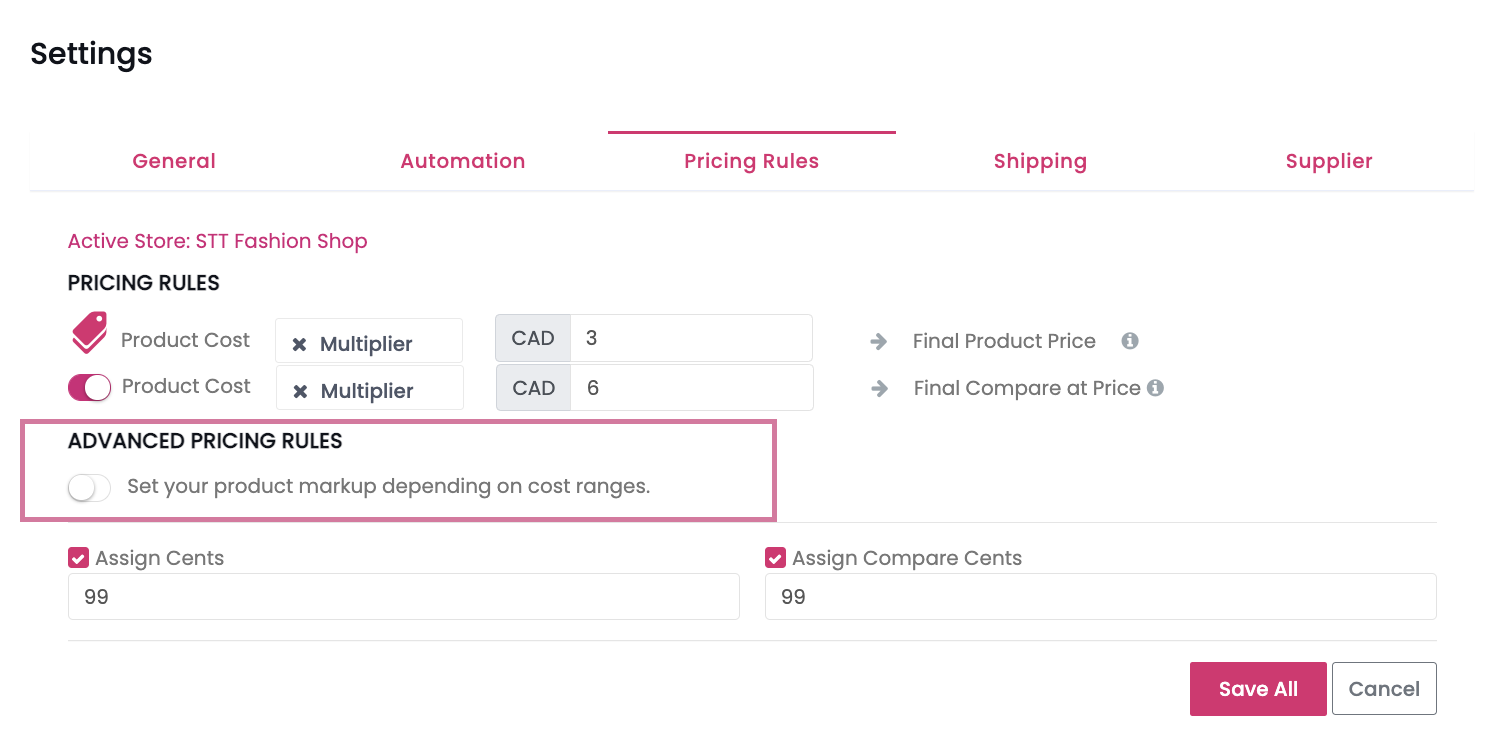
First thing you need to do is turn on Advanced Pricing Rules from within Settings > Pricing Rules tab.
Next we need to configure the pricing rules panel. Note that pricing rules apply to each store independently. So for example if you have 2 stores connected to Sell The Trend, then you have the option of setting pricing rules differently for each store. This is really useful for when you are running different stores with different currencies and want to apply different rules to each store.
There are two different type of pricing rules you can setup. You can choose to markup cost by a Multiplier or using a Fixed Markup. Let's go through the Multiplier method first.
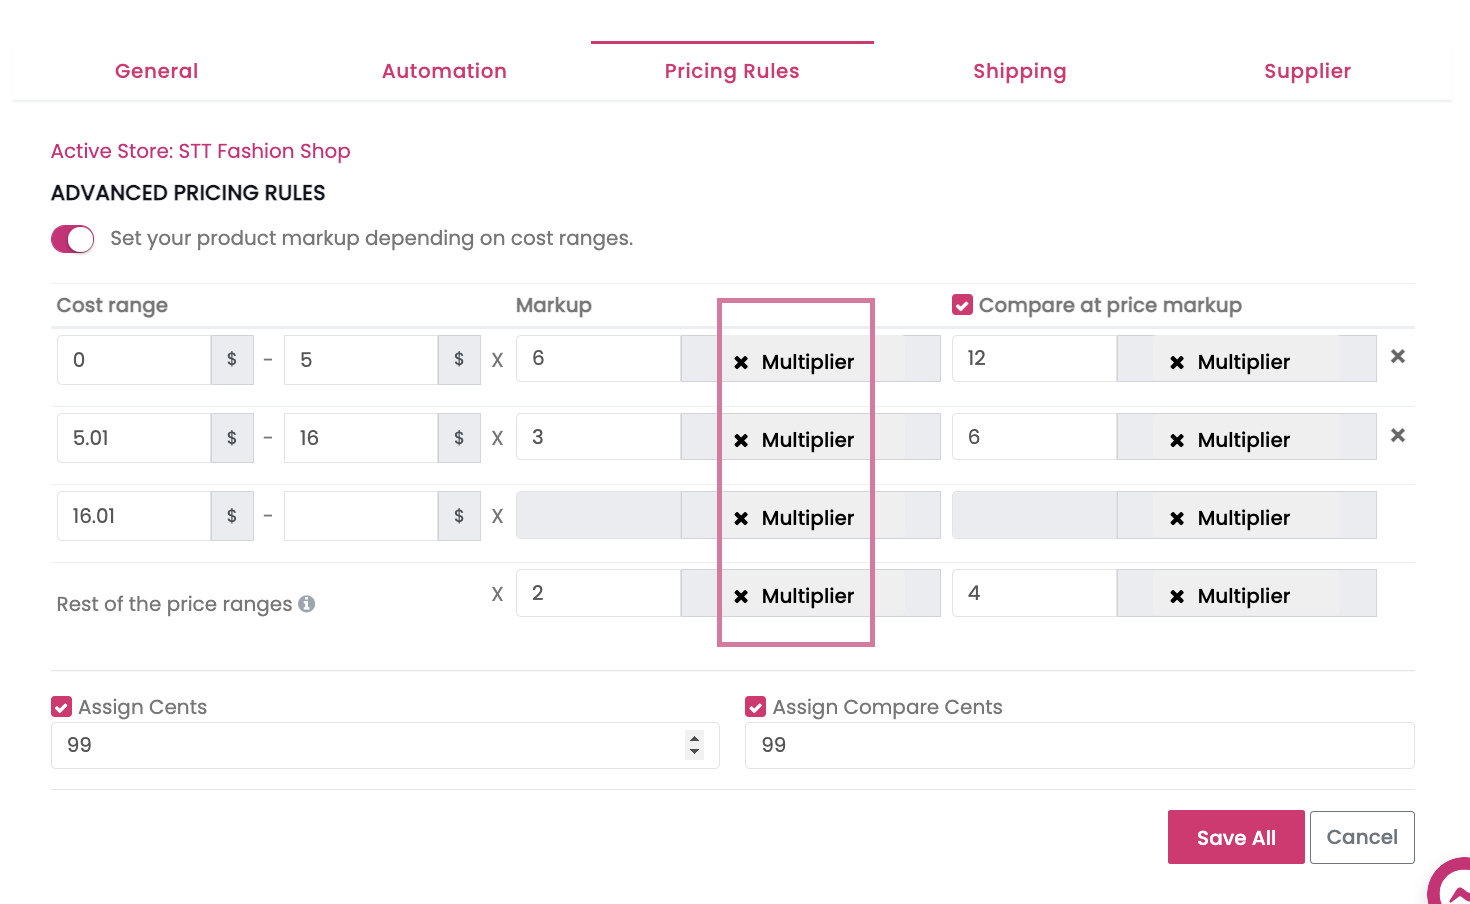
All you have to do is fill in the the Multiplier markup you would like for each cost range. In this example we are choosing to markup products that cost anywhere between $0 to $5 by 6X. So for example if a product costs us $1.99 from the supplier, then Sell The Trend would automatically mark up this item on your shop by 6 times and you would then be selling it for $11.94 ($1.99 X 6). Also since we have the [x] Compare at price markup checked, then we also would mark up the compare at price by 12 times equaling $23.88 ($1.99 x 12).
Following this we would then move on to the next range in this example which is for products costing $5.01 to $16 and we choose to mark those up by 3X (times) and compare at mark them by 6X (times) - and so on.
The second type of pricing rule is similar to the first, but with this method we are setting a fixed cost markup. This means instead of multiplying the cost with the markup amount we are instead adding to the cost a fixed dollar amount.
In this example we are choosing to markup products that cost anywhere between $0 to $5 by $10. So for example if a product costs us $2.99 from the supplier, then Sell The Trend would automatically mark up this item on your shop by $10 and you would then be selling it for $12.99 ($2.99 + $10). Also since we have the [x] Compare at price markup checked, then we also would markup the compare at price by $20 equaling $22.99 ($2.99 + $20).
Following this we would then move on to the next range in this example which is for products costing $5.01 to $16 and we choose to mark those up by $5 and compare at mark them up by $10 - and so on.
For both type of markups you can keep adding as many rows for different ranges as you like. So you can have 10 different markup ranges or even 20! Your markup scheme can be as complex or simple as you like.
On thing to note is that we also have [x] assign cents checked, so all our product prices will automatically be changed to end in .99 to keep a nice uniform pricing across our entire shop.
And that's pretty much it. With this Advanced Pricing Rules, you should be able to dial in the type of markup you would like for every store you have connected to Sell The Trend, further speeding up the process of listing new products.
How to unlink my shopify store?
I can’t add a product to my shopify store, it keeps asking me to connect my store?
Contact support, as you might have another account connected to your store.
I don’t see the Sell The Trend shopify App in the app store, how do I install your app?
Sell The Trend is a webapp, so you would access all the features through www.sellthetrend.com. We do also have our own unlisted Shopify App, that you will be able to install from inside our website once you register. This will synch your shop with Sell The Trend so you can start adding products and fulfilling orders.
If I remove the Shopify App from my Shop does it cancel my subscription?
No. Removing our shopify app from your store does not cancel your subscription. All subscriptions are managed from within the Sell The Trend Website.
In Amazon Explorer, does higher ranking indicate a better position on amazon?
In our Amazon Explorer, Lower Rank is better. So the best rank in Amazon explorer would be Rank 1.
Is customer support included in the subscription?
Absolutely! Our dedicated customer support team is available to assist you at every step.
Is there a free trial available?
Yes, we offer a 100% free trial so you can explore all the features before committing.
Is there a limit on the number of products or stores I can manage?
The number of products and stores you can manage depends on your subscription plan. We do offer some unlimited plans. Check our pricing page for details.
Manual Process to Update Order Info
Updating Aliexpress Order ID Manually
Once you have completed the order process on Aliexpress, if you return to Sell The Trend and notice that the logo is still spinning and the Ali Order No has not been auto-filled, you can manually add it in by following these steps:
1. Go to the Aliexpress order page:
https://trade.aliexpress.com/orderList.htm
2. Locate the order you just placed and grab the order id:

3. Go back to the Sell The Trend Orders page, click on Ali Order No and enter that order id:

Fulfilling Order Manually
If you encounter an issue where clicking "Get Tracking Code" shows the message "Tracking Info Found, updating..." but then the Sell The Trend logo spins and does not fulfill the order, you can fulfill the order manually by following these steps:
1. Go to the Aliexpress order page:
https://trade.aliexpress.com/orderList.htm
2. Locate the order you just placed and click View Detail:

3. Grab the tracking number from the Logistics Section:
![]()
4. Go to the Shopify Admin Orders page for that order and click Mark as fulfilled. In the window that pops up, enter the tracking ID you grabbed from the Aliexpress Logistics section and then click "Fulfill Items" on the right:
My country is not listed in Top Countries in the Nexus, can I still make sales?
Sure. These are just top countries! It does not mean that it's not possible to make sales outside of these countries. Similar products will also have different top countries as some products have different options. This means that different suppliers could be listed which might have different top countries as those suppliers making more sales in different countries.
No Orders Data Available, what does it mean?
We have millions of products in our system and though we always try to get all data on each product sometimes that is not possible. If you see "No Orders Data Available" on a product it means we still don't have all the orders data for that product. That does not mean the product is not good to test or it's not already trending on lots of big dropshipping places. We try to keep scanning to collect this information, so you can check back. If you only want to see products with orders data, filter by Total orders (Has orders data).
Sometimes when I click Aliexpress Link it does not take me to the exact product on Aliexpress?
If a product shows "No Orders Data Available" then the Aliexpress button will take you to a search page and not to the EXACT product. The search page that this product takes you, shows you many similar products and most of the time that will be the case, unless the product title is very specific (like using a model number or brand name).
What determines a store to be listed as a PowerStore?
Power Store designation means that this store has shown ability to pick lots of winners in the past.
What does the subscription cost include?
The subscription cost includes full access to all features of the Sell The Trend app, including ecom store builder, product research tools, store intelligence, and more.
What happens after my free trial ends?
If you choose not to cancel your free trial during the trial period, your payment method on file will be charged and you can continue to enjoy access to all the features in your plan.
What is included in the Success Academy Dropshipping Course?
It's an A-Z dropshipping course that takes you all the way from setting up your first store to running your first Facebook campaign.
What is the Difference between all the different NEXUS Categories like Hot Products and Trending Products?
Hot Products are products that have shown a lot of interest from buyers. These could be products that might be more proven if they are a bit older and have a lot of stores selling. You might see some products that came into our system 6+ months ago, but only now are trending as more people start advertising and selling these products.
Trending Products are hot products that have shown a lot of interest in a more recent time frame, usually within the last 30 days.
On The Rise are products that are new to our system and are showing signs of being future winners.
New Products are new products coming into our system.
NEXUS all products will give you access to all the products that are in the NEXUS. Come here if you are having a hard time locating a particular product or trying to search for something specific and want to see the most amount of options.
All of these NEXUS products are valid for testing and that is why we include all of them.
What is The NEXUS Explorer? How is it different from Aliexpress Explorer or Amazon Explorer?
The NEXUS combines all the other Explorers, like Aliexpress Explorer, Amazon Explorer, Shopify Explorer, etc. So what you see in the NEXUS are the products that are happening on all the other explorers all in one place.
What is the time period for Orders and Sales data?
This is the amount of all time orders or sales that the product has had from the suppliers we are tracking. This is not all orders and sales that this product has had from “every” supplier from around the world.
What is your Custom Store Service?
We have a custom store service that can create a turn-key store business for you. Check it out here https://www.sellthetrend.com/custom
What payment methods do you accept?
We accept major credit cards for payment and PayPal, making it convenient for our users.
What's the catch? With everything that is included, why are you plans so cheap?
There's no catch! This is our commitment to making dropshipping accessible to everyone. We believe that empowering entrepreneurs shouldn't break the bank. Our mission is to support your success without burdening you with exorbitant fees
Why are products under 50 orders listed under Nexus Hot Products and How is it Popular with less than 50 orders?
We judge products on MANY metrics for products featured in our NEXUS Explorer. Just because we don't have orders data for a product doesn't mean it has no orders, it just means we don't have orders data yet.
Why can I not find some products on Aliexpress?
With millions of products in our system, sometimes some products cannot be sourced from Aliexpress. So clicking "Source from Aliexpress" or other Aliexpress links from The NEXUS might only lead to either an Aliexpress "search page" or similar products. This is due to some of these products either being privately sourced or manufactured. We always provide accompanying images in our Fulfillment Source area to confirm sourcing supplier's product selection before you push a product to your shop.
Will Deleting Complete Options Like Ships From Break Order Fulfillment?
Yes! You cannot remove an entire options (like ships from, or color, or size, etc..) from a product in your shop. You can however remove variations like USA, green, large if you don't want to offer those variations for example. You must however leave one type of each option otherwise order fulfillment will break.
So for example if an item ships from USA and China, you can remove either USA or China, but cannot remove both.
Also note that "Ships from" USA variants will only ship to USA addresses, same with UK, Turkey etc... "Ships from" China will ship internationally.
If you do not want your customers to see where an item is getting shipped from for example from China, what you can do is change Ships from China to Ships from "International Warehouse". You can make those adjustments in the Edit Variations section before you Push an Item to your shop or by editing those variation names directly in your ecommerce platform (shopify, Woocommerce...etc..)
Will i pay anything during the free trial?
no! our free trials are 100% free, though you do need to enter a payment method during signup. We use this to reduce spam and fraud.
Will the suppliers include a customer invoice with my shipment?
All the suppliers on the platform understand the shipping model and do not include invoices with the shipped package. But just to be sure, we have added the ability to send the supplier a custom message along with your order, giving them additional instructions. You can find this custom note option in the Settings area.
