
The Best Ad Spy Tools for Ecommerce in 2026: How Top Sellers Actually Validate Winning Products
15 July 2026
Contents
Adding products is the first real step in building a Shopify store that sells. It’s where your ideas turn into actual listings people can buy. But if you’re wondering how to add products to a Shopify store in 2026, there are two main paths: manual entry or automated import.
Both get the job done, but they work in very different ways. One gives full control over every detail. The other saves time and bulk uploads products fast.
In this guide, I’ll break down both methods clearly. You’ll see the pros, the cons, and which one best fits your store.
Manual uploads mean doing everything yourself. Titles, descriptions, photos, pricing—all entered one by one. It’s great for full control, but it takes time, especially if the store has a lot of items.
Automated uploads make the process quicker. You can use a CSV file or a product import app to upload everything in bulk. Some tools even pull the info straight from your supplier. It’s fast and easy, but the listings might need a little editing afterward.
Both methods work. Manual is better for small shops or stores that need a personal touch. Automated is the go-to for bigger stores or anyone trying to save time. It really comes down to how many products you’re adding and how much control you want.
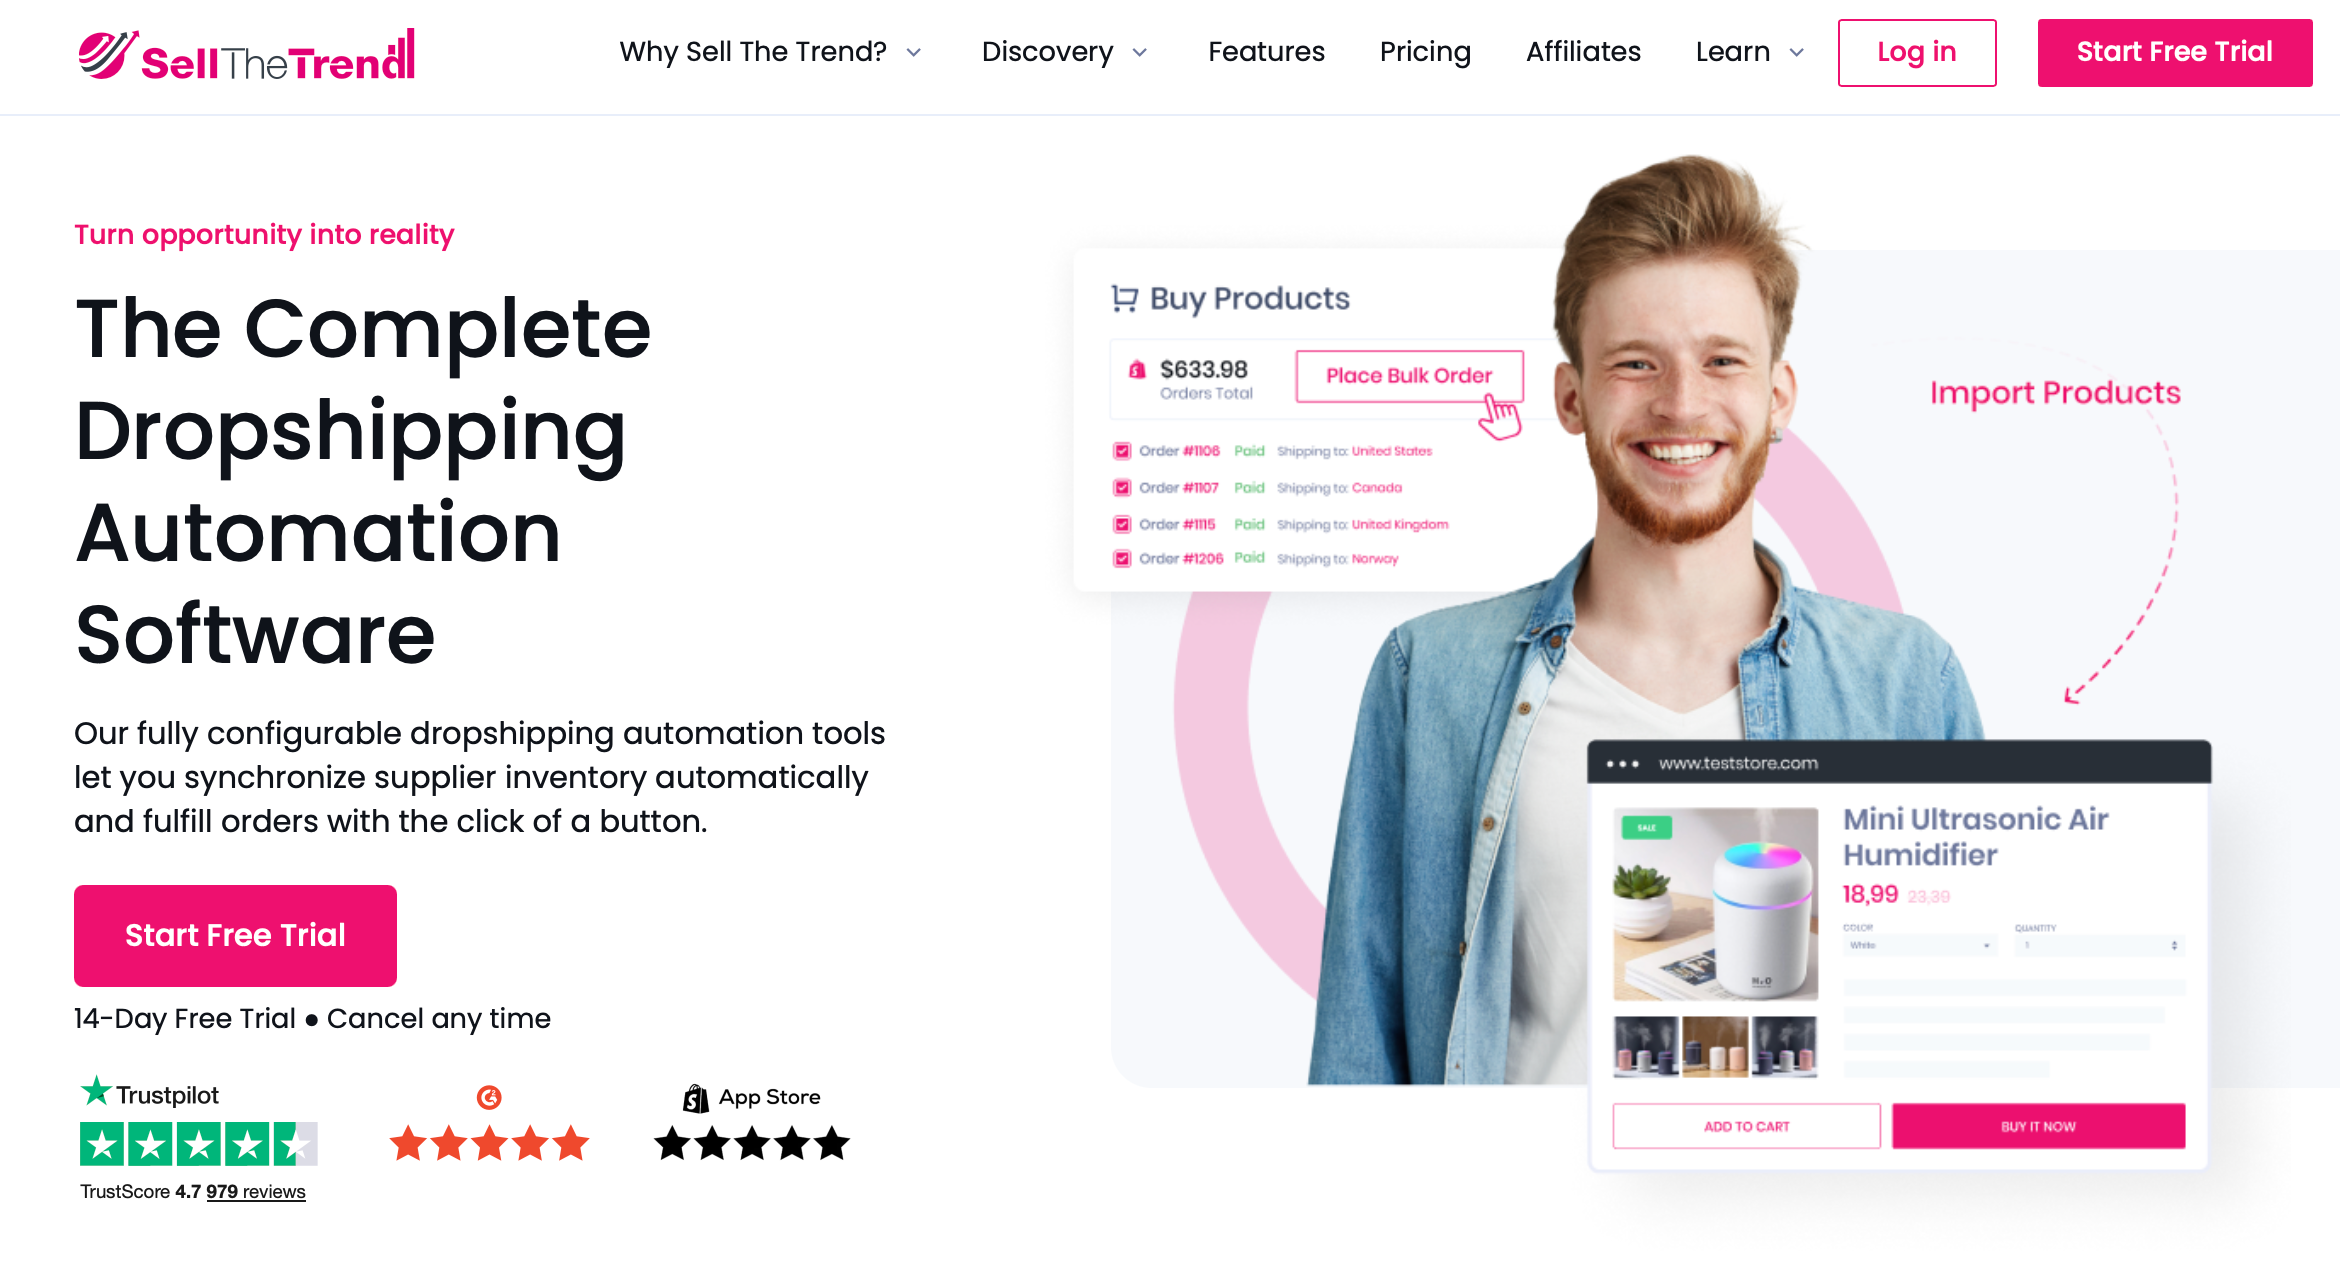
Sell The Trend is one of the easiest tools for automated product upload. It connects directly to Shopify and lets you import products in just one click. Titles, images, prices, and even variants—everything gets filled out for you.
But it’s more than just an importer.
What makes Sell The Trend stand out is the built-in product research. You can browse trending items across marketplaces and decide what’s worth adding to your store. This makes it especially useful for dropshipping or stores that want to move fast without guessing.
Here’s what it handles in one place:
I’ve used Sell The Trend when building stores that needed speed and flexibility. It works well when you want automation but still care about choosing the right products. The listings come out clean, and any small edits can be done inside Shopify after import.
If you’re going the automated route, Sell The Trend is a solid place to start. It handles both product research and upload, which makes testing and scaling much easier.
Below is a step-by-step breakdown of how each method works.
Manual product upload is the most direct way to add products to a Shopify store. You do everything yourself. It’s simple and doesn’t require any special tools or apps. If the store is just starting out or only has a small number of items, this is the cleanest way to get up and running.
You don’t need to mess with spreadsheets or apps. Everything happens inside the Shopify dashboard. It gives full control over how the products are written, how they look, and how they’re organized.
I’ve used this method many times when launching new products or testing out a small batch of items. It takes longer than importing in bulk, but the results are usually cleaner. You can make sure everything is worded the way you want. You can also check the product layout as you go.
That’s it. The product is officially part of your Shopify store and ready for customers to view.
Manual uploads are a great choice when starting small. It’s the method I trust when launching under 20 products or building a highly curated store. There’s more control over the layout and the overall look. It also gives the chance to write descriptions that match the brand voice and format everything cleanly.
But it does take time. If you have 50 or 100 products, it starts to feel slow. That’s when it makes sense to look into automation tools or CSV import methods.
Still, for custom products, handmade items, or stores that need that polished touch, manual wins every time. It’s slower, yes, but nothing gets lost in the process. Every product looks exactly how you want it.
This method is also easier for beginners. No spreadsheets or syncing issues. Just one product at a time, with full control.
If the goal is quality over speed, this is the best way to go.
Automated product upload is the fastest way to add items to a Shopify store. Instead of entering everything by hand, you use a file or an app to import products in bulk. It’s fast, efficient, and ideal for large catalogs or dropshipping stores.
Most people use this method when they have dozens—or even hundreds—of products to add. It saves hours of manual work. You can pull in product details, images, prices, and even inventory info all at once. Some tools even sync directly with suppliers, so your listings stay updated without constant edits.
Everything still shows up in your Shopify dashboard, but instead of typing it all in, the system fills it in for you. That’s the power of automation.
There are a few ways to do it: uploading a CSV file, using a product import app, or syncing with a supplier. Each one works slightly differently, but the goal is the same—bulk upload with less effort.
I’ve used automated tools when building larger stores or working with suppliers who already have product feeds.
Automated uploads also help improve visibility across search engine results by pushing more optimized listings live, faster.
When you set your web address (URL handle) correctly and fill out the search engine listing preview, you’re giving your store a better shot at stronger seo rankings. That means more eyes on your store and more chances to convert potential customers into buyers.
If you need to remove an item, go into your inventory section, select the product, and use the archive product option—or delete the product if you no longer need it at all. To bring it back later, just go to the archived tab and restore it.
Apps like Sell The Trend also help you appeal to target customers by giving you step-by-step instructions to optimize your listings.
Whether you’re updating an existing product with a new title or adding content to a product description field, the process is simple. You can even add media like lifestyle photos to make your product pages feel complete.
And if you’re managing variants, the tool makes it easy to keep things structured so you don’t lose track of product data or confuse your target audience.
It saves a ton of time, especially when the listings follow the same basic format. Out of all the apps I’ve tried, Sell The Trend stands out. It handles product research and importing in one place, and the import process is fast and smooth—just a few clicks and the product is in your store, ready to go.
Here’s how to do it:
This works well if you already have your product info in a spreadsheet.
You can also download Shopify’s sample CSV to get the format right. Make sure column headers match what Shopify expects.
This is ideal for dropshipping or pulling in products from marketplaces.
Some suppliers offer direct Shopify integration. Once connected, their product feed stays synced with your store.
This setup is great for stores with changing inventory, since updates happen automatically. Some tools, like Sell The Trend, also offer syncing features that keep pricing and stock levels aligned in real time.
Automated uploading is a huge time-saver. I always use it when the product count is high or when I’m working with a supplier that updates inventory often. It keeps things efficient and makes scaling easier.
The downside? You give up some control. Imported descriptions might not match your tone. Images might not follow your store’s layout. So after the import, I still check and clean up anything that feels off.
For stores with more than 30–50 products, automation just makes sense. It’s faster, more scalable, and still flexible if you take time to review the listings after import.
If the goal is speed and volume, automated uploading is the way to go. Tools like Sell The Trend make it even easier by handling product research, importing, and even syncing in one place. It’s not perfect—but it gets you 90% of the way there in minutes instead of hours.
Both methods work, but they solve different problems. Manual uploading gives you control. Automated importing gives you speed. The right one depends on your store’s size, how many products you’re adding, and how much time you want to spend.
Here’s a simple way to look at it:
| Feature | Manual Upload | Automated Import |
|---|---|---|
| Best for | Small shops, custom products | Dropshipping, large catalogs |
| Speed | Slower (one by one) | Fast (bulk import) |
| Control | Full control over every detail | Some listings may need edits |
| Tools Needed | None | CSV file or apps like Sell The Trend |
| Skill Level | Beginner-friendly | Also beginner-friendly with good tools |
| Ideal Use Case | Under 20 products | 30+ products or ongoing product testing |
If you’re just starting with a small number of products, manual works fine. You’ll learn the Shopify system and control every detail. But if you’re planning to scale—or already have a large list of items—automated importing will save hours.
I usually start manually when testing a few products, then switch to tools like Sell The Trend when it’s time to grow. It keeps things simple in the beginning and efficient later on.
I’ve added hundreds of products to Shopify stores—by hand and using apps. And no matter which method I used, the same mistakes kept coming up. Sometimes I caught them early. Other times, I didn’t notice until it was too late and had to go back and fix everything.
One of the first things I used to skip was the SEO section. Shopify lets you edit the product title, URL, and meta description—but I used to leave it as-is. That made the listings harder to find and look messy in Google results.
Another big one was copying supplier descriptions. I’d import a product and just leave the default text. It didn’t match my store. Some of it didn’t even make sense. It saved time, but the page looked like every other dropshipping site.
I also rushed through the image part. I’d upload whatever the supplier gave me—some were blurry, others were different sizes or had watermarks. I didn’t think it mattered. But buyers noticed. Bad photos killed the vibe of the whole page.
Then there’s previewing. I used to trust the backend and skip the live preview. Huge mistake. That’s where I caught broken layouts, missing variants, or text that looked fine in the editor but clunky on the page.
And when I first started using bulk import tools like Sell The Trend, I’d get excited and upload 50+ products in one shot. But I wasn’t ready. The listings were full of errors, and it took longer to clean them up than if I had just uploaded 10 and done it right the first time.
Here’s how I avoid those now:
To add products to your Shopify, go to your Shopify admin dashboard and click on “Products.” Then click “Add product.” From there, fill out your product details page with a descriptive title, pricing, images, and inventory. If it’s a physical product, make sure shipping is enabled. You can also choose a specific category or collection to improve product organization. Once everything’s ready, tap save, and the product will appear in your online store.
To import multiple products, go to your Shopify admin, click “Products,” then select “Import.” Upload your product data using a CSV file. This is helpful for store owners managing large inventories. After uploading, review the info and upload images if they didn’t carry over. You can also import from other websites using apps like Sell The Trend. Don’t forget to set up your inventory management properly to track quantity and avoid overselling.
If you’re unable to add products, check if your Shopify account has the right permissions. Sometimes users can’t add products because they’re logged into a staff account with limited access. Also, confirm that the product isn’t hidden in the archived tab. If it’s been archived, you’ll need to unarchive the product before editing. Make sure your sales channels are active too, or the product won’t be visible to buyers.
You can add new sections from your Theme Editor. This is where you can create landing pages, feature products, or highlight offers. If you’re promoting an existing product, use sections to pull in content from the product pages, like reviews or product images. Well-designed sections improve the customer experience and help you guide your target audience toward the right items.
The fastest way is to use an import app or a CSV file for multiple products. You can also use your mobile device’s camera to add images on the go. Automating the process saves time and helps you focus on your online business. Once imported, be sure to update your search engine listing preview, assign collections, and check each publishing section to make sure products go live.
Yes, you can upload any kind of product manually, including digital products and custom items. Simply go to your Shopify admin, click “Products,” then choose “Add product.” From there, write a compelling product description, add pricing, assign a page title, and edit the URL handle for cleaner links. If needed, click “duplicate product” to reuse an existing layout, and just update the content.
Shopify pricing starts at $39/month for the Basic plan. On top of that, you’ll need to consider shipping costs, app fees, and transaction fees depending on your payment provider. Before making your first sale, set your original price, adjust the variants section if needed, and review the search engine listing section for better search engine optimization. Shopify also lets you enter the harmonized system (HS Code) for products that ship internationally, which helps with customs.
Whether you’re adding products one by one or importing them in bulk, the goal stays the same: clean, complete listings that are easy to manage and easy for customers to trust. On one hand, manual uploads give you full control. On the other hand, automated tools offer speed and efficiency. In most cases, store owners end up using both as their business grows.
That said, what really matters is doing it right from the beginning. After all, well-built product pages don’t just help buyers—they also improve how your store appears in search results. As a result, you’ll get more traffic, more clicks, and ultimately, more sales.
So, choose the method that fits your current workflow best. Then, stay flexible and ready to scale when the time comes.
Maria is a marketing specialist with hands-on experience in digital growth strategies and eCommerce.
As part of the Sell The Trend team, she has developed deep expertise in dropshipping through close work with product research, trend analysis, and go-to-market strategies used by successful online sellers.
Her content focuses on practical marketing insights, audience behavior, and data-driven decision-making to help merchants launch and scale with confidence.